
Generally we establish VPN connection using OpenVPN using the connect option present in GUI application. Sometimes we may came across situations in which we need to enable vpn auto connect on the system boot.
I got a similar requirement. I have a desktop server which is located remotely and I want to access it from my laptop. The desktop will be accessible only through my vpn. So if someone turns off the desktop, during reboot, the vpn needs to be autoconnected so that I can access it from my network without any assistance from others. Here is the steps that I followed to achieve this. I created a task in the windows task scheduler. My operating system was Windows 10 (The same steps will work in all the recent versions of windows)
Step 1: Open Task Scheduler
Search for Task Scheduler and Open the Task Scheduler

Step 2: Click on Create Task
Once you open the Task Scheduler, you can see several options. Select Create Task option to create a new task.

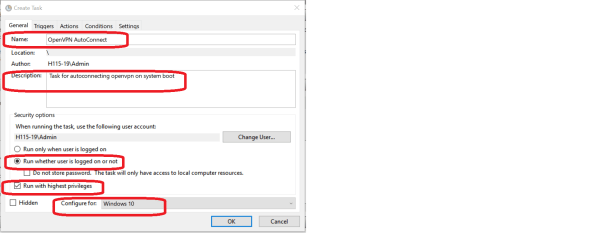
Step 3: Configure the Task details
Start create the task by filling the following details in the General section.
Step 4: Add new Trigger to the Task
Trigger is basically the parameter that tells the system when to trigger this action. We need to create a new Trigger for this task. Click on New and create a trigger as explained in the next step.

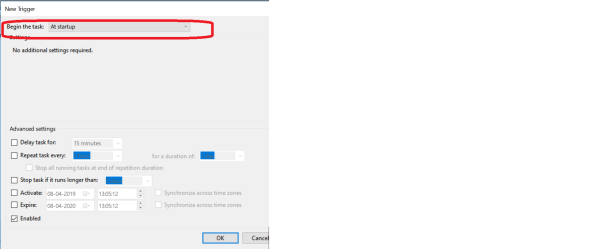
Step 5: Configure the Trigger
We will configure the trigger details in this section. Choose Begin the task: At Start up. This means the task will be triggered during the startup of the system. Further tweaking can be made by setting the parameters in the advanced settings section.
Step 6: Create new Action
This is the main section. This is the action that gets triggered by the task. Here we need to select action as “Start a program”.

Step 7: Configure Action
Our program is the openvpn client. Browse to the openvpn client installation and select the openvpn-gui.exe. The main part is the arguments section. We need to specify the config file in which we need to connect. Here my config file name is amal.ovpn and it is located in the config directory of openvpn installation. If we miss this argument, the openvpn auto connect will not work. To test this command, the simple thing that we can do is by directly executing the command in the command line (Powershell is recommended).
Eg: Go to the bin directory of OpenVPN (C:\Program Files\OpenVPN\bin) and open powershell there.
Execute the following command. The “amal.ovpn” can be replaced with your vpn config file name.
 If the above command is working fine, complete the action configuration and save the details.

Note: The amal.ovpn is the vpn configuration file and is located in the OpenVPN config directory which defaults to “C:\Program Files\OpenVPN\config”
After configuring this, click on ok and save the task. Then test this task by rebooting the system. I have configured this set up several times in several places and it worked perfectly.
Hope this article helped you 🙂 . If you are facing any issues, please comment on this post, I will be happy to help you.
